Wednesday, 19 October 2011

Programming a custom jacquard

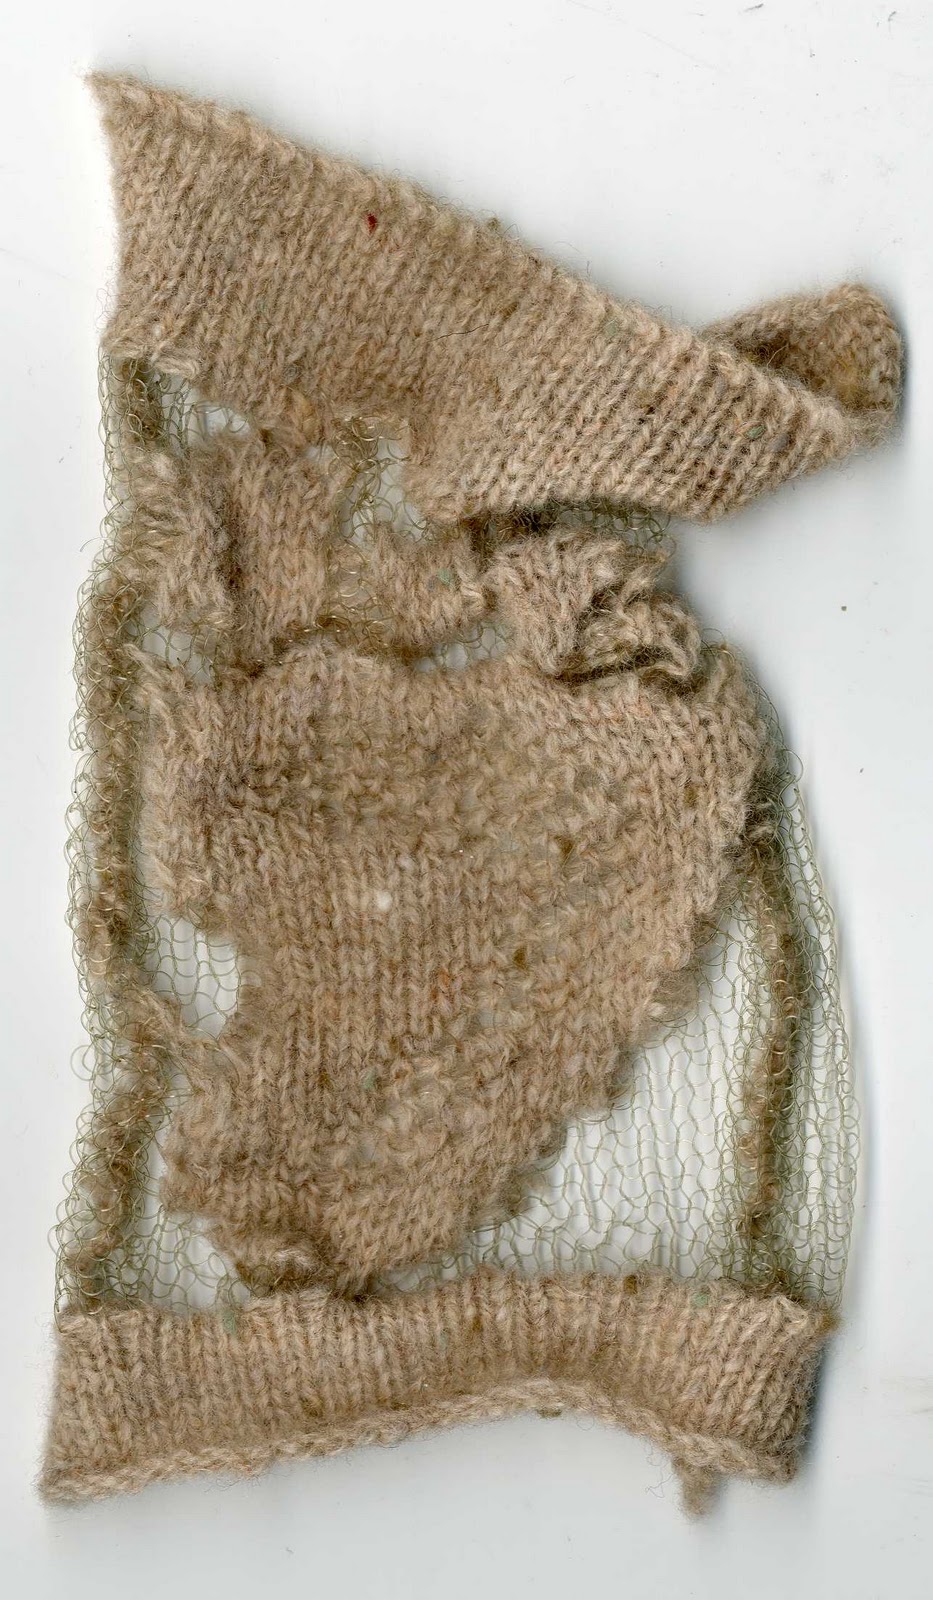
See sample section 013 for instruction sheets and flat knitted representation
Pattern traced from a drawing onto graph paper. One square = one stitch.
Needles are selected automatically according to the number of pattern repeats.
75 stitches wide. Strong lycra used in 'B' feed.
120 Stitches wide. Snagged on fourth pattern repeat.
See sample sections 014 - 024 for samples demonstrating the range of this single programmed jacquard pattern.

I-CORD

Eight stitches, cast on securely. Felting yarn used.
A few metres of I-CORD, ready to turn into a felted fabric.
Ready to tack onto a backing fabric so it stays flat during felting.
Large tacking stitches.
After felting. Not enough tacking stitches and none of the I-CORD has joined
After stitches and backing fabric removed.
Several wraps of the same yarn, joining and overlapping, to turn this into a 'fabric'
After felting, Front.
After felting, Back.
See sample section 006

This didn't work as well as planned. I assumed the I-CORD would join if I stitched it down roughly. (Perhaps a 'fuzzier' yarn would have helped this). For any chance of this working as a flat but thick fabric, the I-CORD would have to be arranged into rows, and tacked down every centimetre.

I tried to rescue this sample by wrapping lengths of the same yarn around all of the I-CORD, however the result is messy. Securing all of the ends and tucking them in would improve the appearance.


Manipulating knitting fabric

60 stitches wide, cast on and off securely
Tied with an acrylic yarn (as this wouldn't felt and become trapped in the fabric)
After felting in the CUBEX machine with a few drops METAPEX36 and litre boiling water for five minutes
After removing the ties.
See sample section 005
Felted with irregular shapes. Held in with rubber bands during felting.
See sample section 005
This sample is tied randomly and looks almost amateur, however the large wraps of the non felting yarn have left an interesting contrast between felted and non felted in the same fabric. See sample 

The CUBEX machine should always be used with the lid tightened down and the safety cage in place. Usual measurements for felting one sample are a few drops of METAPEX36 and a kettle of just boiled water (one litre). METAPEX36 is an irritant and gloves should be worn when removing felted items from the water. 

These samples were tied securely by first creating a loop I could pull tightly around the selected area. The two ends were passed around opposite ways and tied in a double knot. The long ends left for easier removal.
 
200 stitches wide, cast on and off securely. First row tied with strong cotton yarn.
'Bobbles' are pulled up and tied, in rows. Alternating underneath each row.
Tied completely. Fabric has shrunk beyond all recognition due to manipulation.
After felting, all of the ties have stayed in place due to tying method.
Starting to remove the ties, very difficult despite the cotton yarn.
All ties removed. Fabric shows clear intended structure.
All 'bobbles' snipped in half with scissors.
After this I painted with ink and acrylic; See sample section 008

This sample is at its best for me at the 'tied completely' stage. The loose knit of the fabric makes for a beautiful soft drape and is tied easily. After felting the fabric becomes rigid, however this is ideal for cutting into without fraying or disintegrating. The white showcases the shadows and texture. I intend to create another version of this without felting, perhaps on a much larger scale with matching or appropriate coloured ties. This type of work shows dedication, intention and precision. 


Four ends of felting yarn have made a lovely varigated fabric, with a solid handle. 120 stitches wide.
Tying this was much harder due to the thick fabric. Same method used as before.
Four rows of bobbles completed, ready for felting.
Felted. A really subtle effect.
See sample section 007

Thursday, 6 October 2011

Machine knitting

I've been experimenting with achieving 3D texture on a single bed Brother knitting machine. 

Back
Front

See sample section 002
This sample was cast on using the secure method (wrapping each needle selected and brought all the way forward, from the left hand side of the bed, right over left, one needle at a time. Yarn put into the carriage and brought across once, weights and comb then hung). This texture was made by hooking up several stitches on each row using the three prong transfer tool, more or less after each time the carriage had been passed. This sample was cast off using a secure cast off (transferring one stitch from the very edge onto the next needle, then reknitting these stitches with the loose thread) I prefer the back of the sample, as the texture is unusual.

Overlaid with some knitted monofilament
Hooking up as described before, using only monofilament
See sample section 003

Two ends of felting yarn.  
See sample section 001
Colour test, cast on and off securely.
See sample section 001
Hooking up, back view.
See sample section 002
Hooking up, front view.
Hooking up, back.
See sample section 002
Hooking up, front.
Jacquard patterns are preset on the knitting computer attached to the machine. Please see hard copy for set up instructions.

Preset Jacquard pattern using one felting yarn and one non felting.
See sample section 004
Preset Jacquard pattern using one felting yarn and one non felting.
See sample section 004
Preset Jacquard motif, monofilament and felting yarn.
See sample section 002

All of these samples feature a solid colour, where as my visual research is very varied. The 'hooking up' samples are successful, and I like the contrast between the textures on the jacquard knits.

Wednesday, 5 October 2011

Old photograph

Before

After, following the 'old photograph' tutorial as featured before

Old photograph - Photoshop

I searched for an online tutorial for creating old looking photos in Photoshop. I found an in-depth one at http://quinnstephens.com/tutorials/oldphoto.html The inspiration for this was a found photograph that I've featured more than once in my visual diary blog. 

I practiced on a photo I took of some clouds, in the hopes it would become less 'twee'

Before

After

Friday, 30 September 2011

Cyanotype printing


I read about the cyanotype process on the Alternative Photography website.


I bought my chemicals (Ferric Ammonium Citrate & Potassium Cyanide) from www.Silverprint.co.uk, which I mixed separately to the recipe specified on Alternative Photography (25g FAC to 100ml water, 10g PC to 100ml water) in brown glass bottles which I was able to purchase at the pharmacy (light safe).

As the chemicals (when mixed) are light sensitive, it is essential to work in a dark room. I did this by blacking out the window of the spare room with thick black plastic. The only 'safe' light to work in is a tungsten bulb (this is a normal energy saving bulb).

I ripped a sheet of A1 cartridge paper into pieces just larger than my medium format negatives and coated these (with an equal measure from each bottle, mixed) using a foam brush for speed and to ensure a solid finish without brush strokes or gaps. I was able to paint these under the tungsten light and left them to dry in complete darkness.

 Select items to make a 'resist' print, choose negatives or transparancies and lay these out. Resist items tend not to need pressing under a sheet of glass, where as I would consider it a crucial step for negatives as they have a tendency to curl (leaving you with a blurry finish).

Resist cyanotype printing

Paper coated and dried in the dark, shells arranged.
After two hours, indirect sunlight.
Once the print achieves a steel grey type tone, it is ready to be rinsed in cold tap water.

Negative/Transparancy cyanotype printing

 These negatives have a good range of tone, which I hoped would be reflected in the finished print.


12pm - 11am exposure
25 negatives under glass
I rinse the prints 5 at a time in 8 litres of cold tap water. It is essential to change the water this frequently as any under-exposed chemical rinses away, so as a consequence the water stops 'washing'.

Cyanotypes drying flat on the table, afte rinsing

The exposed prints look very dark blue/grey, most of this washes away to reveal a bright cyan print. Negatives with very dark overall tone will need to be exposed for long periods of time if the sunlight isn't strong and direct. Any under-exposed print will simply wash away, leaving a frame on the paper. This is due to the negative being harder to penetrate than plain paper.

This print has exposed perfectly and the tonal range is superb.
This print is under-exposed, yet the image is still on the paper. This negative had an overall darker tonal range.
This print has exposed well and is crisp.
Completely under-exposed, image washed away.

Exposure time varies from day to day, time of year, time of day, situation of exposure. I experimented with exposing half a print, almost a test strip.

The half with the image remaining was exposed for half an hour, in direct sunlight. The covering paper was then removed, leaving the whole image to develop for another half an hour. In the second and final half an hour, the sun went in and a significant difference can be noticed. This half of the image has washed away completely, where as the remaining image is not too far off developed. This clearly indicates the importance of experimenting with exposure times at different times of day.

Toning cyanotypes with tea and coffee

I made the coffee solution by mixing one heaping tablespoon of cheap instant coffee with 500ml of boiling water, stirred and left to cool. Coffee gives COLD tones.
I made the tea solution with four cheap teabags with 500ml of boiling water, steeped for five minutes, teabags squeezed and removed, left to cool. Tea gives WARM tones.

I left the prints to soak, one at a time, face down in the tea/coffee. These prints were a couple of weeks old, and the emulsion was set. New prints (same day) will be too unstable to tone straight away.

Some sources suggest bleaching the prints first, however I find the prints tone well enough without this process.

2 hours, Tea.
5 hours, Tea.
5 hours, Coffee.
2 hours, Coffee.